|
|
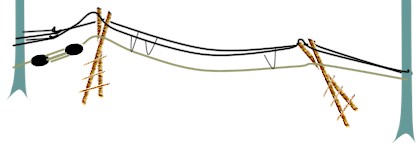
Building a Rope Bridge
(click for printable copy)
A rope bridge is a great way to
learn a few knots and have fun while you do it. The project that is described
here can be put together in 30-45 minutes.
If you have to learn the knots as you
go then allow a bit more time.
Where To Build
The best place to build the bridge is on flat ground between 2
anchors (trees) about 20 metres (60 feet) apart. I have used a telephone pole as
an anchor and in a pinch you can create a holdfast (described later).
DO NOT succumb to the temptation to build the bridge over a gully
or stream. Unless the bridge will be used to actual cross these areas on an
ongoing basis there is no point in adding the additional effort.
Equipment List
| Quantity |
Item |
Comments |
| 4 |
2.4-3m (8-10ft) spars |
Ideally the 3m length. All spars must be good quality. DO
NOT use dowelling. |
| 2 |
1m (3ft) spars |
|
| 2 |
1.5m (4.5ft) spars |
|
| 2 |
2m (6ft) spars |
|
| 30m (100ft) |
3cm (1in) natural fiber rope |
This is the footrope and I prefer the natural fiber. It
gives a good grip to the soles of the shoes and it is not elastic like
nylon. |
| 2 X 45m (150ft) |
1.5cm (.5in) rope |
These are the handrails |
| 10 X 2m (6ft) |
.6cm (1/4in) rope |
These are the stringers |
| 14 X 3.5m (12ft) |
.6cm (1/4in) rope |
These are for lashing. I prefer braided nylon or better
still, braided polyester. |
| 1 |
3 X block and tackle expandable to about 3m (10ft) |
A 2X can be used but you will have to tension it more often
if natural fiber rope is used. |
| 2 pcs |
burlap or heavy cloth |
This material will protect the lashing where the
footrope crosses the trestle. |
| 1 short |
heavy rope |
Depending on the type of anchor you use you need a method to
attach the block of the block and tackle. |
Step 1 - Build the 2 trestles
|
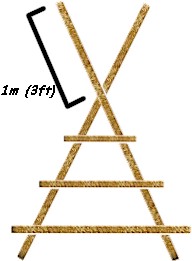 |
Lay out 2 sets of spars as shown in the diagram and lash the
spars together with a square lashing where they cross. (Note: Ensure the
lashing at the crossing point of the longest spars is done well.) |
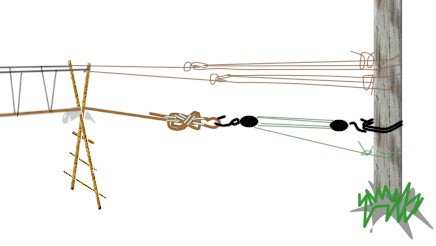
Step 2 - Lay out the long ropes
- Attach the footrope and the 2 handrail ropes to one of the anchors with
"round turn two half hitches". (note: If your handrail rope
is a single length then loop the rope around the anchor twice to prevent
slipping)
- String the ropes out on the ground to the next anchor.
- Attach the block and tackle to the second anchor and stretch it out
towards the first anchor.
- At the point that the end of the block and tackle meets the
footrope, tie
a loop in the footrope using a bowline (if the end is handy) or a figure 8
1/2. DO NOT use an over hand knot to create a loop. You will have a great
deal of trouble releasing the knot afterwards.
- Attach the block and tackle to the footrope
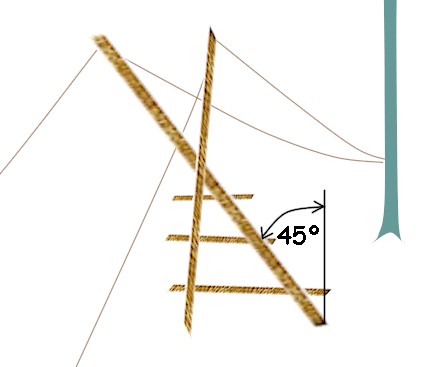
Step 3 - Attach the first trestles
- Lay 1 trestle under the long ropes so that the top of the trestle is about
3m (10ft) from the 1st anchor and the bottom of the trestle is pointing at
the anchor.
- Attach the handrails to the tops of the long spars with
clove hitches.
- Lift the top of the trestle and position the bottom
such that the trestle is leaning away from the anchor at about 45 degrees.
- If the two handrails are not taking up equal tension adjust the length by
slipping the clove hitch.
Step 4 - Attaching the second trestle
- Slip the second trestle under the 3 long ropes so that the top of the
trestle is about 10m from the 1st trestle, and the base is pointing at the
1st trestle. (Note: The top of the second trestle should not be within
1.5m (5ft) of the point the block and tackle and the footrope are attached.
Shorten the distance between the two trestles if necessary)
- Tie the handrails to the top of the 2nd trestle with clove
hitches.
- Lift the top of the trestle and swing the bottom in until the trestle
leans against the handrails at a 45-degree angle.
- The two handrails should be parallel with the same amount of sag. If not
then adjust them by slipping the clove hitch at the second trestle.
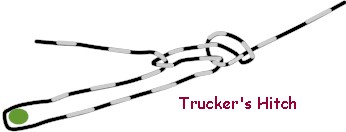
- Take the ends of the handrails and pass them around the anchor and back
and tie a "trucker's hitch" (see diagram).
- Tension the handrails enough to take out the slack between the anchor and
the 2nd trestle.
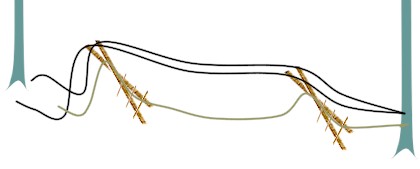
Step 5 - Attach the stringers
- Tilt the 2nd trestle so that it is leaning away from the anchor and
towards the other trestle.
- Adjust the tension in the handrails so that they are reachable from the
ground the entire length between the trestles but clear the ground by about
1.5m (5ft) half way between.
- Tension the footrope with the block and tackle so that it runs
parallel to the handrails
- Equally space the stringer ropes (~1 metre - 3ft apart)
the entire length between the trestles and
attach them by tying a "round turn two half hitches" to the handrail
and a "clove hitch" to the footrope. (Note: Ensure that
the "round turn two half hitches" are tied at the very end of the
rope and that the "clove hitch" is tied at the centre.)

Step 6 - Tensioning
- Swing the bottoms of the 2 trestles in so that they are
completely upright.
- Apply tension to the handrails with the trucker's hitch.
- Reposition the trestles so that they have a slight tilt (5 degrees) away
from their respective anchors (this makes climbing onto the bridge easier)
- Insert the burlap between the footrope and the "V" of the
trestle
- Tension the footrope.
Step 7 - Safety inspection
- Check all knots (do this on a regular basis)
- Reposition any stringers that do not go vertically from the
footrope to
the handrail.
Step 8 - Have fun!
- As each person crosses the bridge, 2 spotters should walk along, one on
either side.
- The best way to cross is to walk with your toes pointed out and your knees
bent slightly.
Special Notes:
- The "special effort" mentioned in Step 1 that is required
if you put the bridge over a gully or steam is a fourth line strung high
over the bridge that can take the weight of anyone that falls off the
bridge. Each person crossing the bridge must wear a harness and be fastened
from the harness to the safety line by a traveler.
- The large spars must be strong enough to absorb the
severe stress of the heaviest person using the bridge. ALWAYS collect spars
green. Deadfall will break! My favourite is maple about 5cm (2in) diameter.
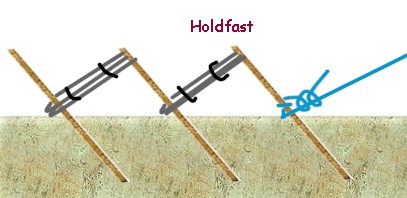
- When trees or solid poles are not available for anchors use a
"holdfast"
(click
to see real holdfast)
|